Tuesday, April 25, 2017


My new display rack at the Bellefonte Paint Out Day to celebrate Earth Day.

The Earth Day Paint Out in Bellefonte, PA was a great day for this artist! I totally enjoyed my time at the AlleyCat Quiltworks with owned and operated by Barbara and Tom Dann of Bellefonte. What a delightful couple! We discovered that we have much in common and that we love Centre County and Bellefonte, in particular. We enjoy all forms of art, craft, and creativity, and that our common bond was quilting. We had some great conversations, a nice lunch from Brother's Pizza around the corner from the shop, and Tom even went out to find a chocolate Coke (or Pepsi, whichever!) to satisfy my cravings in the afternoon.

While I brought my art quilts to share, we pinned them to some sturdy display boards so the visitors to the shop could see what I did besides that which I was to demonstrate: watercolor painting. We shared quilting techniques, tools, and knowledge while having active conversations about our earlier education, our parenting, grand-parenting, and for me, great-grand-parenting, among a host of other topics. And we entertained those who stopped in to see what we were about.

My two little demo paintings. I must admit that I'm out of practice when it comes to watercolor painting. I've spent a lot of time working on rebuilding my acrylic painting expertise. But my watercolors have taken a back seat for a few years. I hesitated bringing acrylic (permanent) paints into a quilt shop for obvious reasons. I can control watercolor a lot easier than I control my acrylic painting! With watercolor, I can work small with fewer supplies and so it was I chose to paint two kittens for the demo. Neither is quite done at this time, but you can see how far things went!

Barbara and Tom operated a quilting business - and by that I mean they are dedicated to preserving an old art/craft but in new ways. Barb has a large long-arm quilting machine that she has owned and operated for over 17 years. She has cared for her equipment by keeping it in tip-top condition; well cleaned, well oiled, and parts replaced as needed over the years. And she does it all herself!

One of the shop specialties is the creating and quilting of T-shirt quilts. If you've never seen or heard of a T-shirt quilt, then I can only wish I had taken photographs of their Steelers and Penn State T-shirt quilts that were hanging on the wall! Many of us have collected T-shirts of favorite places, teams, hobbies, and more over our life-time. As have our kids and grand-kids. Some T-shirts are worn until they become thread-bare while others are treasured in the bottom drawer somewhere for "special" use, only. Well let me tell you that one special use that can be made is a glorious wall hanging or a memorable bed quilt for one's self or a loved one. At our house, we all wear our T-shirts until they wear out. But I know many other folks who collect T-shirts with a passion that matches any collector of any collection!

The day was well spent and all three of us (I presume!) went home happy after the time spent with the public and together.

Monday, April 17, 2017

Busy, Busy, BUSY!!!


Matted prints of new acrylic and old watercolor paintings ready for upcoming shows. Click on the image to enlarge it for a detailed look at the work.

Occasionally one forgets how much work is involved in preparing for demonstrations or upcoming exhibits. The past two weeks has been super busy as I realized that I could have small prints of some of my paintings, making my art more affordable to those who can't afford an original painting. That said, I set about searching for a company that could provide mat boards, backing boards, and plastic sleeves (aka fitted bags) to properly exhibit prints of my work. I found the company at Matboard & More LLC.

I already had some wonderful cold press art papers from Epson to work in my old Epson Stylus Photo 1400 printer. I tested the paper and found that the paintings came out looking fantastic on these papers, so I printed up about 40 pieces in two different sizes to have ready for the upcoming shows. Then, of course, I had to sign the prints, put them in the mats, and finally in the bags. Now that it's behind me, I can say it was all worthwhile!

Newly completed acrylic bird paintings in my new display rack for upcoming exhibit opportunities.

In preparation for my Open Studio, I also needed some sort of display rack to hold the paintings that do not fit on my studio walls. At the moment, I have 24 finished paintings hanging in the studio - this after a weekend of rearranging, installing new window treatments, and cleaning the studio. Only 18 pieces fit on the wall, so how best display the remaining few? I love shopping on-line - thankfully. So I looked for display racks - of which there are many thousands to choose from! Who knew??? I finally found something that would work with my sizes of artwork at Displays2Go. And I found something sturdy and affordable! It was under $35.00 including shipping and handling. You can see from the above photo that it works very well for my purposes.

I probably should have started this entry with the fact that last month I sold two pieces via this blog and another 9 pieces at the State College Framing Company & Gallery. Thus I felt I could invest in the business of art - all with the intention of being able to pay for my supplies, at the very least! Below are the pieces sold during the month of March.

A collage of the art work sold during the month of March 2017, the earnings from which are paying for the expenses of this month!

Most people are unaware of how much art supplies cost the artist. Above are just a few of the expenses that artists make in order to increase the sales. One day perhaps I will post photos of all the supplies stored in every possible corner of my studio, not to mention stored in the sewing studio downstairs... But this is enough for today. Hope you enjoy the little tour!

Thursday, April 13, 2017

Painting Up A Storm!


Baby Bluebird Begging for Food - (c)Pat Dolan - 12"x12" - acrylic - $200.00

I've got spring fever! It's coming out in my choice of subject matter - notice that I've got lots of spring harbingers, nestlings, and fledglings in this series. One would think I am obsessed with Spring! And it has been delightful to paint this series, to look outside and see as well as hear the Robins greet the dawn and dusk. While I haven't yet seen the baby Bluebirds at our feeder with a parent, I have seen one baby Blue out of the nest while out on our walks.

The Bluebird above is painted from a photo I took last spring on our deck.

Then there are the Robins... I think I have 4 or 5 of them painted by now. Here are three. The first one is acrylic done on an Artist Pro Gesso Panel while the latter two are painted on standard stretched canvas.

Nestling - (c)Pat Dolan - 12" x12" - acrylic on ProPanel Gesso Board - $170.00

Spring Robin - (c)Pat Dolan - 12"w x 9"h - acrylic on stretched canvas - $170.00

Winter Robin - (c)Pat Dolan - 12"w x 9"h - acrylic on stretched canvas - $170.00

All these paintings are more will be available during my Open Studio the weekend of May 6th & 7th, sponsored by the Art Alliance of Central Pennsylvania. I'm also making prints of several of my paintings which will also be available on-line as well as during the open house. If interested in any of the paintings shown here or in prints of one of my paintings, leave a comment and I will get in touch with you. Thanks, all!

Wednesday, April 05, 2017

Great Blue Heron - Step by Step


Great Blue Heron - acrylic - 11"x14" - Pat Dolan

Tracking the progress of this Great Blue Heron, I photographed it at several stages, including completion, above. Below, the first stage of painting - roughing in the basic colors/shapes. The photos above and below are the same first stage, just different perspectives.

Below, adding more color, still very rough painting style. Just wanting to lay down the important areas of color.

Adding the eye always seems to bring the bird to life. Adding the long beak also helps give the Heron a more life-like appearance.


The beginning of adding more color, more detail, determining the proper shaping, flow, etc.

Adding more depth of color, more detail in the wing with the flowing white/blue-gray feathers cascading down the edge of the wing... If you click on the image, you will get a closer view of this image.


The completed painting is at the beginning of the post. I hope this helps you understand a bit of the process of taking a drawing to a completed painting!


Sunday, April 02, 2017

A Belted Kingfisher Today


I'm back to working in acrylic paints on stretched canvas. Today, the Belted Kingfisher and the Great Blue Heron occupied my afternoon. Above, the first stages of the Kingfisher, followed by the next few steps in bringing the bird to life.


Adding the eye always makes a large improvement!

Adjusting the shading, coloring, and details...

After providing the bird with a suitable perch, here is the completed painting:
Belted Kingfisher - 8" x 10" - acrylic on canvas - Pat Dolan - $85.00 + postage + handling (PA residents add 6% sales tax)


Saturday, April 01, 2017

New Watercolors: Baby Birds!


Two completed paintings done today on DaVinci Pro Panels - smooth finish. These are the first watercolors I've attempted on this new surface. Note that the edges of the Pro Panels can be painted to complement or match the painting. Also, these pieces can be sprayed with varnish to protect the painting from being damaged.

One things that is fascinating about this medium on this support is that you can wipe off part or all of the whole painting with a wet cloth or by putting it under the water faucet! That makes it easy for making corrections. It also makes it tricky for making corrections! Watercolor is a tricky medium to begin with - so being able to wipe out mistakes and repaint the area is a great benefit. One can rarely do that on watercolor papers. However, when one is making the new corrections, it is easy to overshoot the mark and contaminate a part that wasn't to be touched! Practice. Practice. Practice!

And varnishing the completed paintings is a MUST since the painted image can be wiped away so easily... Several coats of varnish, I'm thinking...

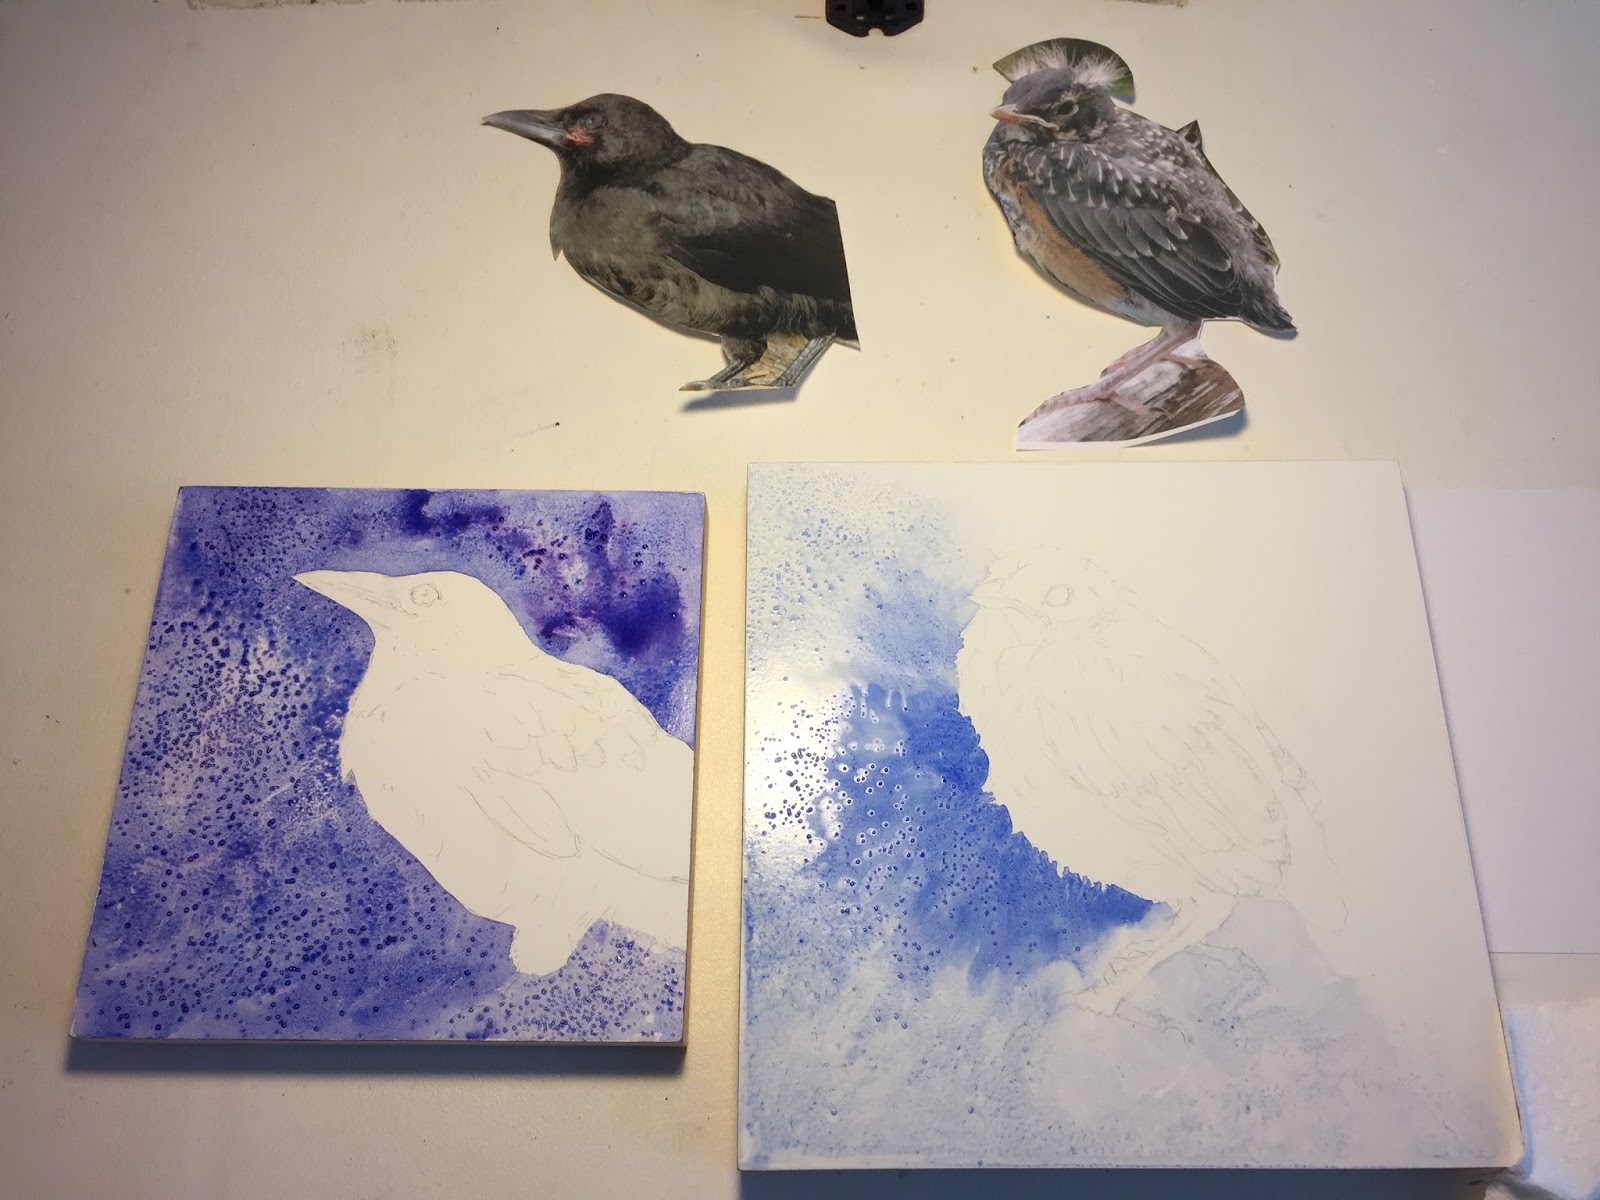
Here are some step-by-step photos to show you the progress of the pieces as I worked on them throughout the day. The drying time is longer on these panels that it would be on watercolor paper. The surface is far less absorbent thus takes much longer to dry. I wish I had made several other watercolor projects to work on in between these two since the drying time took so long! Next time I will know better!

These first few photos simply show the studio set-up and the laying in of the backgrounds on these two pieces. I used salt liberally on the Baby Crow and much less so in the blue area in front of the Baby Robin.

I decided that the background for Baby Crow was way too busy, too dark, too much competition with the actual bird to show up properly. So I began wiping parts of the background off with a damp paper towel. Much to my surprise, the method worked rather well, as can be seen in the next photo.

Later, I took even more of the background out - directly around the bird's head so that the bird will come forward out of the background and make an impression on the viewer.

The Baby Robin seemed almost to paint itself - perhaps after working on a different baby Robin yesterday in colored pencil prepared me to paint this one today.

With watercolor, one generally paints from light to dark, saving the lightest spots from the beginning and putting in the contrasting dark areas towards the end - just prior to adding any small details that serve to complete the image.

Finally, here are the two pieces side by side after I painted the edges to complement the artwork. The Crow needed a dark edge, but the Robin is much lighter and less dramatic, so I chose to paint the outside edges white.
Baby Crow - 7 3/4" square - watercolor ------------------- Baby Robin - 9 3/4" square - watercolor
Both paintings are available. Contact me if interested.

Now I want to paint in watercolor - but preferably on reliable, familiar watercolor paper!